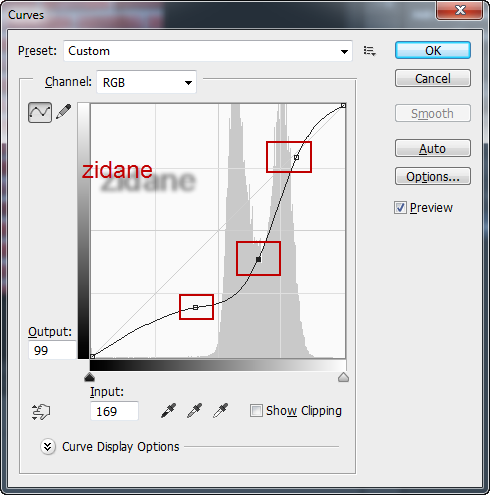
Curves in Photoshop is a powerful tool that lets you adjust the brightness, contrast, and color of your images. You can use Curves to make your photos more vivid, dramatic, or artistic. Here are some steps on how to use Curves in Photoshop:
• First, open the image you want to edit in Photoshop.
• Next, create a Curves adjustment layer by clicking the half-filled circle icon at the bottom of the Layers panel and choosing Curves. Alternatively, you can go to Layer > New Adjustment Layer > Curves or click the Curves icon in the Adjustments panel.
• Then, in the Properties panel, you will see a graph with a diagonal line. This is the curve that represents the tonal range of your image. The bottom left corner is the shadows, the top right corner is the highlights, and the middle is the midtones. You can drag any point on the curve to change the brightness and contrast of your image.
• To make your image brighter, drag a point on the curve upwards. To make it darker, drag a point downwards. To add contrast, create an S-shaped curve by dragging a point near the shadows downwards and a point near the highlights upwards. Conversely, to reduce contrast, create an inverted S-shaped curve by dragging a point near the shadows upwards and a point near the highlights downwards.
• Furthermore, to adjust the color balance of your image, you can choose a different channel from the drop-down menu next to the Auto button. You can choose from RGB (red, green, blue), Red, Green, or Blue. Each channel affects a different color range in your image. For example, if you choose the Red channel, dragging a point on the curve to the left will add more red to your image, while dragging it to the right will add more cyan (the opposite of red).
• Additionally, to fine-tune your adjustments, you can use the On-image adjustment tool, which looks like a hand with an arrow. Click on this tool and then click and drag on any area of your image that you want to adjust. This will create a control point on the curve that corresponds to that area. You can then move this point up or down to change its brightness and color.
• Finally, to reset your adjustments, you can click on the Reset button at the bottom of the Properties panel. You can also delete any control points by dragging them off the graph
Here is detail step for you
Example: I want to edit below natural color of the brick, it very light.
Explore My Other Channel for More Cool and Valuable Insights
👉 Youtube Learn Tech Tips👉 Tiktok
👉 Facebook:So In Photoshop, we choose the layer background and click choose Image > Adjustments > Curves and press CTRL + M => will show the curves dialogs same as below screenshot
Here you can adjust the curves of panel same as above image until you like the color with you adjust. Is it easy to do it!.


