Background
Break News
How to add local font to Tailwind Css and NextJS? - Tutorial Design Pattern? - Blockchain Technology, How to create own Bitcoin virtual currency - Zustand mordern management state - Design Pattern - Flyweight Pattern? - Docker Full training Topic

[Tips] How to use PuTTYGen to generate SSH private and public keys

Thursday, 12 March 2015
|
Read: Completed in minutes

[Tips] How to use PuTTYGen to generate SSH private and public keys

SSH, or Secure Shell, is a protocol that allows you to securely connect to remote servers and devices over the internet. To use SSH, you need a pair of keys: a private key that you keep secret, and a public key that you share with the server or device you want to access. The keys are used to encrypt and decrypt the data that is exchanged between you and the server or device.

One way to create SSH keys is to use PuTTYGen, a key generator tool that is part of the open-source networking client PuTTY. PuTTYGen can create various types of keys, such as RSA, DSA, ECDSA, and EdDSA, which are different algorithms for generating and verifying the keys. PuTTYGen can also convert keys to and from other formats, such as OpenSSH and SSH.com.

To use PuTTYGen to generate SSH keys, follow these steps:

•  Download and install PuTTY from here. PuTTYGen is included in the installation package.

•  Run PuTTYGen from the Start menu or by typing "puttygen" in the Run dialog box.

•  Choose the type of key you want to generate from the bottom of the window. The default is SSH-2 RSA with 2048 bits, which is recommended for most users.

•  Click on the Generate button and move your mouse randomly in the blank area to generate some randomness for the key.

•  When the key is generated, you will see a public key in the text box at the top of the window. You can copy this key and paste it into the authorized_keys file on the server or device you want to access. This file is usually located in ~/.ssh/ directory on Linux systems.

•  You can also save your private key by clicking on the Save private key button. You will need this key to log in to the server or device using PuTTY or another SSH client. You can optionally enter a passphrase to protect your private key from unauthorized use.

•  You can also save your public key by clicking on the Save public key button. This is useful if you want to share your public key with others or use it for other purposes.

PuTTYGen is a simple and easy way to create SSH keys for secure connections. 
 

#PuTTYGen #SSH #keys #security #networking #PuTTY #RSA #DSA #ECDSA #EdDSA  

To help you understand better, I have provided a clear breakdown of the steps below.

Step 1:  Start


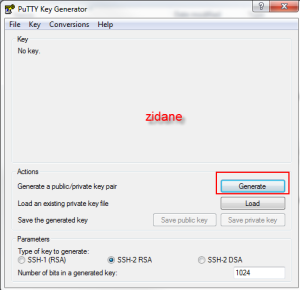
Open Putty Key Generator (puttygen.exe in the putty folder) which should look something like:


How to use PuTTYGen to generate SSH private and public keys

PuTTYGen supports 3 key types:
  1. SSH-1 (RSA),
  2. SSH-2 RSA,
  3. SSH-2 DSA
SSH-1 has some design flaws which make it more vulnerable than SSH-2. SSH-2 also contains more features than SSH-1. Only choose SSH-1 if the server/client you want to connect to does not support SSH-2. The default SSH-2 RSA is probably better than SSH-2 DSA.

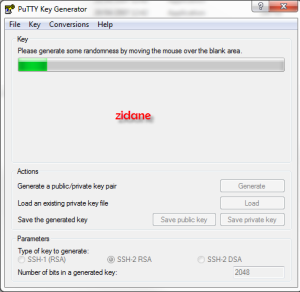
Step 2: Click Generate to start the key generation.

You should now see something like the figure below (make sure you move your mouse as suggested above the progress bar):

Step 3: View Result

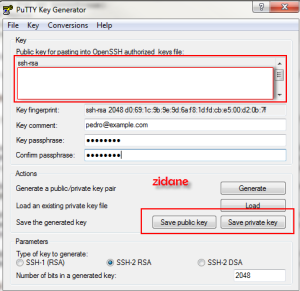
The result of the key generation is shown below, with the public key highlighted in red   (in the box labelled Public key for pasting into OpenSSH authorized_keys file).
The Key passphrase is an additional way to protect your private key, and is never transmitted over the internet. The strength of your key is not affected by the passphrase in any way. If you set one, you will be asked for it before any connection is made via SSH (a bit annoying probably). Setting it might gain you a few extra moments if your key falls into the wrong hands, as the culprit tries to guess your passphrase. Obviously if your passphrase is weak, it rather defeats the purpose of having it.

Step 4: Save your public key and private key

Thank you for reading this post. I hope you found it helpful and easy to follow. If you have any feedback or questions about Using PuTTYGen to generate SSH private/public keys , please share them in the comments below. I would love to hear from you and discuss this topic further
✋✋✋✋  Webzone Tech Tips Zidane, all things tech tips web development  - I am Zidane, See you next time soon ✋✋✋✋

πŸ™‡πŸΌπŸ™‡πŸΌ We Appreciate Your Comments and Suggestions - Webzone, all things Tech Tips web development
Popular Webzone Tech Tips topic maybe you will be like it - by Webzone Tech Tips - Zidane
As a student, I found Blogspot very useful when I joined in 2014. I have been a developer for years . To give back and share what I learned, I started Webzone, a blog with tech tips. You can also search for tech tips zidane on Google and find my helpful posts. Love you all,

I am glad you visited my blog. I hope you find it useful for learning tech tips and webzone tricks. If you have any technical issues, feel free to browse my posts and see if they can help you solve them. You can also leave a comment or contact me if you need more assistance. Here is my blog address: https://learn-tech-tips.blogspot.com.

My blog where I share my passion for web development, webzone design, and tech tips. You will find tutorials on how to build websites from scratch, using hot trends frameworks like nestjs, nextjs, cakephp, devops, docker, and more. You will also learn how to fix common bugs on development, like a mini stackoverflow. Plus, you will discover how to easily learn programming languages such as PHP (CAKEPHP, LARAVEL), C#, C++, Web(HTML, CSS, javascript), and other useful things like Office (Excel, Photoshop). I hope you enjoy my blog and find it helpful for your projects. :)

Thanks and Best Regards!
Follow me on Tiktok @learntechtips and send me a direct message. I will be happy to chat with you.
Webzone - Zidane (huuvi168@gmail.com)
I'm developer, I like code, I like to learn new technology and want to be friend with people for learn each other
I'm a developer who loves coding, learning new technologies, and making friends with people who share the same passion. I have been a full stack developer since 2015, with more than years of experience in web development.
Copyright @2022(November) Version 1.0.0 - By Webzone, all things Tech Tips for Web Development Zidane
https://learn-tech-tips.blogspot.com